【Bootstrap 4】背景画像の上にボタンや文字を自由に表示する方法、手順、レスポンシブレイアウト等(初心者向け)

ホームページでよく、背景画像にボタンや文字を表示していてカッコいいデザインがありますよね。 その簡単なやり方をお伝えします。
目次
背景画像の上にボタンや文字を自由に表示する方法
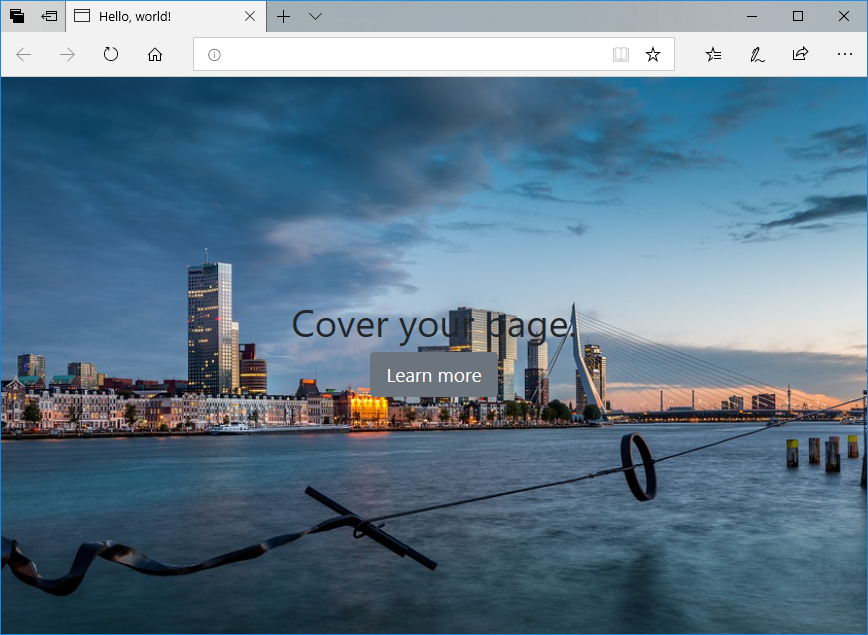
下のコードをコピペして実行してみてください。こんな画像を表示します。

<!DOCTYPE html>
<html lang="en">
  <head>
    <!-- Required meta tags -->
    <meta charset="utf-8" />
    <meta
      name="viewport"
      content="width=device-width, initial-scale=1, shrink-to-fit=no"
    />

    <!-- Bootstrap CSS -->
    <link
      rel="stylesheet"
      href="https://stackpath.bootstrapcdn.com/bootstrap/4.3.1/css/bootstrap.min.css"
      integrity="sha384-ggOyR0iXCbMQv3Xipma34MD+dH/1fQ784/j6cY/iJTQUOhcWr7x9JvoRxT2MZw1T"
      crossorigin="anonymous"
    />

    <title>Hello, world!</title>

    <!-- Custom -->
    <style type="text/css">
      body,
      html {
        height: 100%;
        background-image: url('https://cdn.pixabay.com/photo/2019/04/24/15/31/rotterdam-4152380_960_720.jpg');
        background-position: center;
        background-repeat: no-repeat;
        background-size: cover;
      }
    </style>
  </head>
  <body class="text-center">
    <div class="cover-container d-flex w-100 h-100 mx-auto flex-column">
      <header class="mb-auto"></header>
      <main role="main">
        <h1 class="cover-heading">Cover your page.</h1>
        <a href="#" class="btn btn-lg btn-secondary">Learn more</a>
      </main>
      <footer class="mt-auto"></footer>
    </div>

    <!-- Optional JavaScript -->
    <!-- jQuery first, then Popper.js, then Bootstrap JS -->
    <script
      src="https://code.jquery.com/jquery-3.3.1.slim.min.js"
      integrity="sha384-q8i/X+965DzO0rT7abK41JStQIAqVgRVzpbzo5smXKp4YfRvH+8abtTE1Pi6jizo"
      crossorigin="anonymous"
    ></script>
    <script
      src="https://cdnjs.cloudflare.com/ajax/libs/popper.js/1.14.7/umd/popper.min.js"
      integrity="sha384-UO2eT0CpHqdSJQ6hJty5KVphtPhzWj9WO1clHTMGa3JDZwrnQq4sF86dIHNDz0W1"
      crossorigin="anonymous"
    ></script>
    <script
      src="https://stackpath.bootstrapcdn.com/bootstrap/4.3.1/js/bootstrap.min.js"
      integrity="sha384-JjSmVgyd0p3pXB1rRibZUAYoIIy6OrQ6VrjIEaFf/nJGzIxFDsf4x0xIM+B07jRM"
      crossorigin="anonymous"
    ></script>
  </body>
</html>
表示自体はこれで終わりです。以下は解説です。
解説①:背景画像の表示について
1. 全画面表示で、かつレスポンシブル表示が必要なので、body部は全て背景にします。
⇒ background-image:(URL)
2, 画像は中央に表示させます。
⇒ background-position: center;
3. 画像をそのまま大きくして余分な画像は削除します。
⇒ background-size: cover;を指定します。
4, 画面に合わして描画しようとすると、同じサイズの画像を複数枚表示しようとするためやめさせます。
⇒ background-repeat: no-repeat;
結果は以下になります。
    <!-- Custom -->
    <style type="text/css">
      body,
      html {
        height: 100%;
        background-image: url('https://cdn.pixabay.com/photo/2019/04/24/15/31/rotterdam-4152380_960_720.jpg');
        background-position: center;
        background-repeat: no-repeat;
        background-size: cover;
      }
    </style>
因みに、background-image:のみにすると以下になります。ダサッ

解説②:文字を中央にする方法について
まずは、body部でclass="text-center"を使用して文字を左右の中心に持ってきています。
後は上下の中心に持ってくる必要があるのですが、
"d-flex w-100 h-100 mx-auto flex-column"と、 header部とfooter部のclassに指定している"mb-auto"と"mt-auto"で実現しています。
d-flexでは"w-100 h-100 mx-auto"で横・縦を100%表示にしてflex-columnでflexboxを縦並びにします。flexboxとはFlexible Box Layout Moduleのことで、要素のサイズが不明なものでも柔軟なレイアウトを組めるCSSです。d-flexではFlexboxをより使いやすくしています。
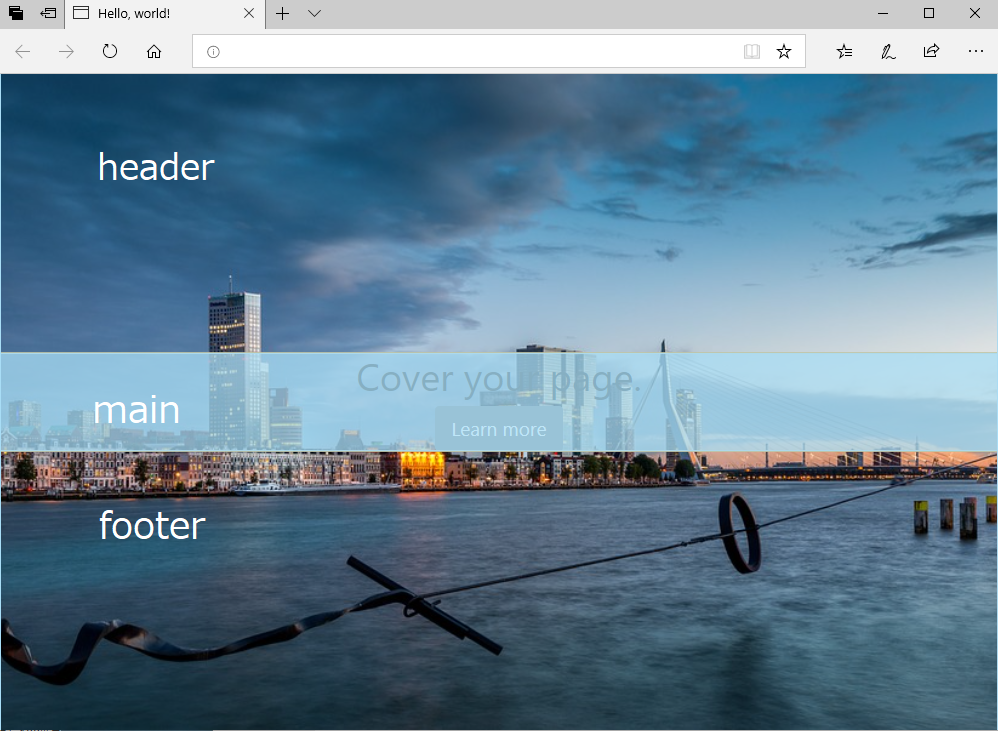
d-flexがflexboxとみなしているのは、header・main・footerの3つです。そして、mb-autoは下側のマージンをauto 、mt-autoは上側のマージンをauto、つまりは使用していない部分はautoとしているため、中央からheaderとfooterの幅を決定しています。
今回は文字とボタンがあるので、その縦幅のみをmainとしてそれ以外はheaderとfooterにしています。
以下の様にheader・main・footerが分かれます。

結果は以下です。
  <body class="text-center">
    <div class="cover-container d-flex w-100 h-100 mx-auto flex-column">
      <header class="mb-auto"></header>
      <main role="main">
        <h1 class="cover-heading">Cover your page.</h1>
        <a href="#" class="btn btn-lg btn-secondary">Learn more</a>
      </main>
      <footer class="mt-auto"></footer>
    </div>
</body>
ドキュメントは以下です。興味があればご覧ください。
flexのDocument
getbootstrap.com
まとめ
レイアウトはd-flexを使用すれば簡単に作成できることが多いのでぜひ使い方をマスターしてください!